I think you have read my previous post What is Flashing? if not please read that first.
I wrote this blog after I had successfully flashed my Nokia X2-01. So don’t be afraid to flash your mobile. It is very easy to flash Nokia S40 using BB5 Easy Service Tool (BEST) and it supports almost all nokia s40 mobiles.
Requirements:
- Nokia Suite
- BEST
Download links are given in previous post What is Flashing?
After dowoading all required softwares install Nokia Suite. Exit Nokia Suite if it is open, also exit from background. BEST will not connect to mobile if Nokia Nuite is open. Extract all files from downloaded BEST zip archive to your pc/laptop.
Before flashing charge your mobile battery to full and backup your all items. In mobile, set USB data cable mode to Nokia Suite so your mobile can automatically connect to Nokia Suite mode while flashing process. Your mobile automatically restarts during flashing process so ignore that and only do which is given to the pc screen while flashing. Delete password of memory card if set any and remove memory card and sim card.
Modes of Flashing:
There are normal or dead mode and automatic or manual mode of flashing.
Normal mode is for normal working mobile and dead mode is for bricked mobile or the mobile which is not turning on or displays test mode in the screen. In mamual mode you can choose your desired flash files. Remember MCU should always be selected because it is main flash files. In automatic mode BEST automatically defines the flash files according to flashing types.
Flashing Types:
You can flash the following files combinations in manual mode:
MCU, MUC-PPM, MCU-CNT and MCU-PPM-CNT
Flashing modes are:
- Full Flash (MCU-PPM-CNT):
On full flash all the flash files are installed in mobile and all the data will be erased. - PPM Only (MCU-PPM):
Mobile data will not be deleted. - Dead Flash:
For bricked/dead mobiles.
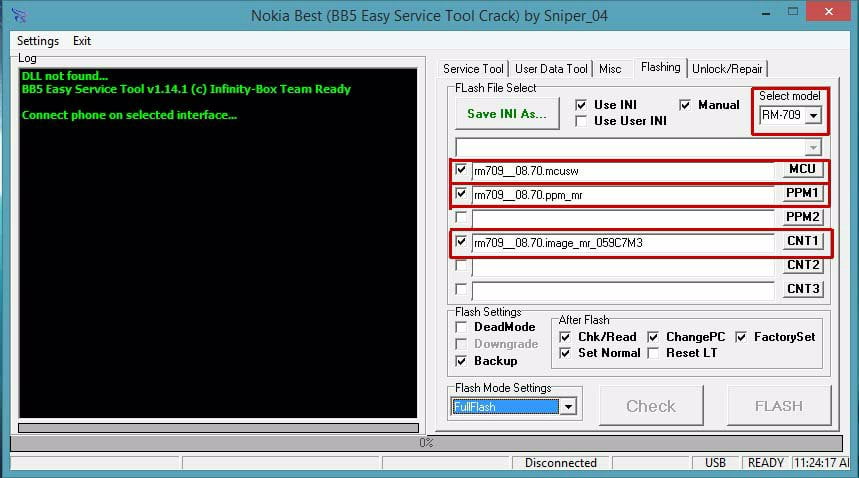
Now open BEST and connect your mobile with data cable. It gives the message about missing dll file (screenshot is given in the zip file). Check manual flash and select your mobile RM type.
To check your mobile RM just dail *#0000#. You can see at the bottom of BEST if it is connected or not. Then click on flash tab and locate your flash files (see screenshot).
Click MCU and locate ‘mcusw’ file. Then click PPM1 and locate ‘ppm’ file and click CNT1 and locate ‘image’ file. Select your flashing mode (full flash mode is recommended). Then click FLASH to start flashing. Now the FLASH button becomes STOP. When the process ends the button again changes to FLASH and a message appears for successfull flash.